Introduction
Welcome to the Zeltacode Business invoice software Module!
This powerful tool is designed to simplify your billing and invoicing processes, helping you save time and manage your finances with ease. Whether you’re a freelancer, small business owner, or reseller, AutoInvoicing provides all the essential features to streamline your operations.
Key Benefits
- Save Time: Automate recurring invoices and reduce manual effort.
- Get Paid Faster: Enable secure and instant payments through integrated gateways like PayPal and Stripe.
- Professional Branding: Customize your invoices with templates that align with your brand.
- Stay Organized: Access real-time insights into your financial activities with the dashboard and reports.
Who Is It For?
AutoInvoicing is tailored for:
- Freelancers managing multiple projects.
- Small to medium-sized businesses handling high-volume transactions.
- Resellers offering apps, modules, or subscriptions on a recurring or one-time basis.
What to Expect in This Manual
This manual will guide you through every feature of the AutoInvoicing module, including:
- Initial setup and configuration.
- Creating and customizing invoices.
- Managing recurring payments and payment gateways.
- Monitoring your financial performance with dashboards and reports.
By the end of this guide, you’ll be equipped to use AutoInvoicing to its full potential and enhance your billing experience. Let’s get started!
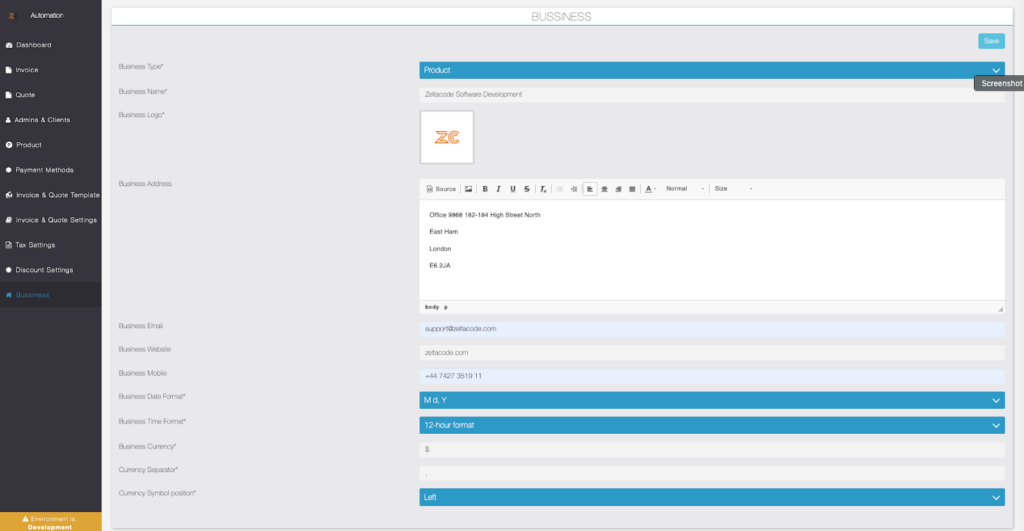
Business Settings Form
The Business Settings form allows you to set up your business profile, ensuring your invoices reflect accurate and professional details. Here’s a quick guide to filling out the form:

- Business Type:
- Select the type of business (e.g., Product or Service) from the dropdown menu.
- Business Name:
- Enter the name of your business as you want it displayed on invoices.
- Business Logo:
- Upload your company logo by clicking on the logo placeholder and selecting an image file. This logo will appear on your invoices.
- Business Address:
- Provide your full business address in the text box. This will be displayed on invoices as the official business location.
- Business Email:
- Enter the email address for client communication or invoice queries.
- Business Website:
- Add your website URL (optional) to include it on your invoices.
- Business Mobile:
- Input your contact number to make it easier for clients to reach you.
- Date Format:
- Choose the preferred date format for invoices from the dropdown (e.g., “M d, Y” for Jan 11, 2025).
- Time Format:
- Select the time format (12-hour or 24-hour) as per your preference.
- Currency Settings:
- Currency: Select your preferred currency (e.g., USD, EUR) from the dropdown.
- Currency Separator: Choose a separator (comma or dot) for numerical formatting (e.g., $1,000.00 or $1.000,00).
- Currency Symbol Position: Decide whether the currency symbol appears before or after the amount (e.g., $100 or 100$).
- Save Settings:
- After entering all details, click the Save button at the top-right to ensure your settings are applied.
Discount Settings of Business invoice software
The Discount Settings feature of business invoice software allows you to configure and manage discounts effectively, ensuring flexibility for both item-level and total invoice-level discounts. Here’s how you can use this feature:


Discount List
The Discount List page displays all the discounts you’ve created. Each discount includes the following details:
- Discount Category:
- Inline Discount: Applies the discount to individual invoice items (e.g., a discount on a single product or service).
- Total Discount: Applies the discount to the total invoice amount.
- Discount Label: A descriptive title for the discount (e.g., “New Year Discount”).
- Discount Type:
- Flat: A fixed discount amount (e.g., $50).
- Percentage: A percentage-based discount (e.g., 10%).
- Discount Value: Shows the value of the discount, based on the type selected.
- Actions:
- Edit: Click the green pencil icon to modify an existing discount.
- Delete: Click the red trash icon to remove a discount.
Practical Use
- Inline Discounts: Use these to offer discounts on specific products or services, such as a limited-time deal on an item.
- Total Discounts: Perfect for applying overall discounts like “New Year 10% off” to an entire invoice.
Tax Settings
The Tax Settings feature of business invoice software allows you to define and manage tax categories for invoices. You can create taxes for individual items or for the entire invoice. Here’s a detailed guide for setting up and using this feature:


Tax List
The Tax List page displays all the taxes you’ve defined. Each tax includes the following details:
- Tax Category:
- Inline Tax: Applies tax to individual invoice items.
- Total Tax: Applies tax to the total invoice amount.
- Tax Label: A descriptive title for the tax (e.g., “Sales Tax” or “VAT”).
- Tax Type:
- Flat: A fixed tax amount (e.g., $50).
- Percentage: A percentage-based tax (e.g., 17%).
- Tax Value: Displays the tax value based on the type selected (flat or percentage).
- Actions:
- Edit: Click the green pencil icon to modify an existing tax.
- Delete: Click the red trash icon to remove a tax.
Practical Use
- Inline Tax: Use for item-specific taxes, such as different tax rates for various products or services.
- Total Tax: Perfect for overall taxes like VAT, GST, or service tax applied on the total invoice.
Invoice and Quote Settings
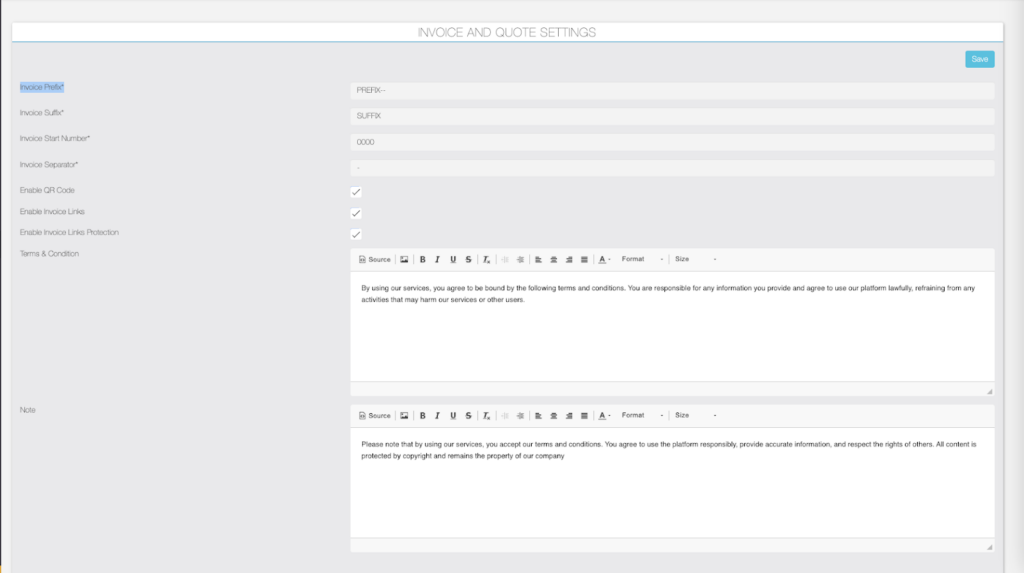
This section of business invoice software allows you to set up default configurations for invoices and quotes. These settings ensure uniformity, security, and professionalism in your documents.

Settings Details
- Invoice Prefix:
- Add a prefix to your invoice or quote number to make it unique and identifiable (e.g., “INV-” or “QUO-“).
- Invoice Suffix:
- Add a suffix for additional customization (e.g., “-2025”).
- Invoice Start Number:
- Define the starting number for your sequence (e.g., “0001”). The numbering will auto-increment for each new invoice or quote.
- Invoice Separator:
- Choose a separator symbol to format your invoice number (e.g., “-“, “/”, or none).
- Example:
- Prefix: INV-
- Start Number: 0001
- Suffix: 2025
- Separator: –
- Final Invoice Number: INV-0001-2025
- Enable QR Code:
- Include a QR code on invoices and quotes for easy access. Clients can scan the code to view the document and make payments instantly.
- Enable Invoice Links:
- Generate secure and shareable links for invoices and quotes. Clients can use these links to view and download the documents online.
- Enable Invoice Link Protection:
- Protect invoice links by requiring clients to log in with the same credentials used in their app account. This ensures that only authorized users can access the document, adding an extra layer of security.
- Terms & Conditions:
- Set default terms and conditions that will appear at the bottom of invoices and quotes. These terms ensure legal clarity for your transactions.
- Note: The terms are editable at the time of creating an invoice or quote, allowing users to modify them for specific situations if needed.
- Note:
- Add default notes that will be displayed at the bottom of invoices and quotes (e.g., payment instructions or thank-you messages).
- Note: This field is also editable during invoice or quote creation, offering flexibility to tailor the message as required.
How It Works
- After setting up these configurations, click the Save button at the top-right to apply them.
- All new invoices and quotes will use these settings by default, ensuring consistency and efficiency. However, terms, conditions, and notes can be customized for individual invoices or quotes when necessary.
Invoice & Quote Template Customization
This section of business invoices software allows you to customize the colors and appearance of your invoice and quote templates, ensuring they align with your brand’s visual identity. Here’s a breakdown of the options available:

Customization Options
- Template Header Background:
- Choose the background color for the header section of your invoices and quotes.
- Template Header Text Color:
- Set the text color for the header, ensuring it contrasts well with the background for readability.
- Template Body Background:
- Select the background color for the main body of the template, where items and details are listed.
- Template Body Text Color:
- Define the text color for the main body to enhance visibility and match your brand’s style.
- Template Footer Background:
- Customize the background color for the footer section, where terms, conditions, and additional notes are displayed.
- Template Footer Text Color:
- Set the text color for the footer, ensuring it is easily readable against the footer’s background.
- Template Item Grid Color:
- Choose a color for the grid lines in the item list table, giving the template a clean and professional look.
- Template Item Grid Text Color:
- Define the text color for the item grid, including product or service names, quantities, and prices.
Practical Tips
- Use contrasting colors for text and background to ensure readability.
- Select brand-aligned colors to maintain consistency across all client-facing documents.
- Preview the template after saving changes to ensure the design looks professional and legible.
Payment Methods
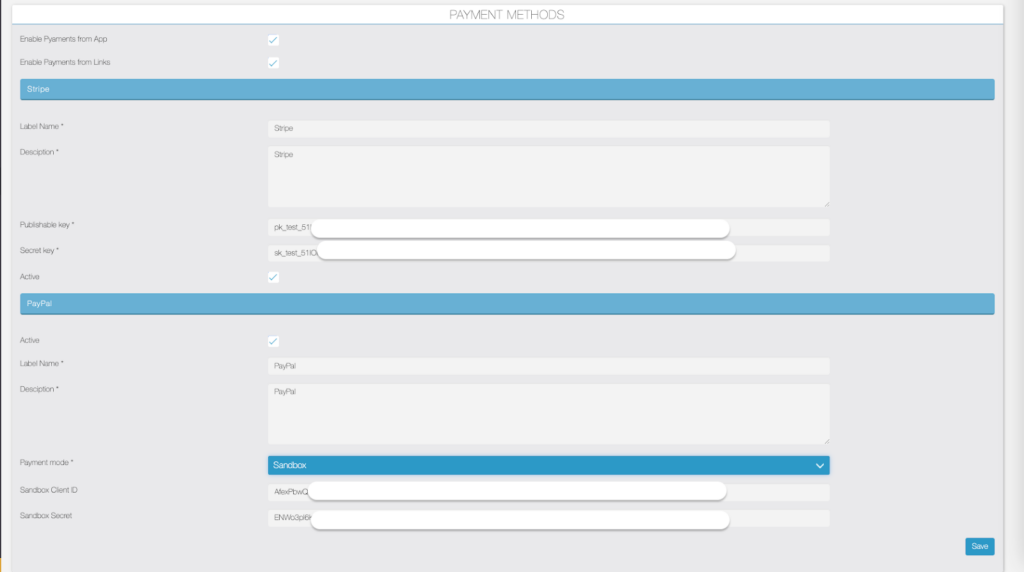
This section allows you to configure payment gateways to enable seamless transactions for your invoices and quotes. The module currently supports PayPal and Stripe, with the flexibility to operate in both sandbox (test) and live (production) environments.

General Settings
- Enable Payments from App:
- Toggle this option to allow clients to make payments directly from the app.
- Enable Payments from Links:
- Enable this option to let clients pay through shared invoice links.
Stripe Settings
- Label Name:
- Enter a label for Stripe (e.g., “Stripe”) to identify it in the system.
- Description:
- Provide a short description of Stripe as your payment method.
- Publishable Key:
- Enter your Stripe publishable key, obtained from your Stripe account.
- Secret Key:
- Enter your Stripe secret key, also obtained from your Stripe account.
- Active:
- Check this box to activate Stripe as a payment option.
PayPal Settings
- Active:
- Check this box to activate PayPal as a payment option.
- Label Name:
- Enter a label for PayPal (e.g., “PayPal”) to identify it in the system.
- Description:
- Provide a short description of PayPal as your payment method.
- Payment Mode:
- Select the mode of operation:
- Sandbox: Use this mode for testing payments without actual transactions.
- Live: Use this mode for real transactions with clients.
- Select the mode of operation:
- Sandbox Client ID:
- Enter the client ID for your PayPal sandbox account.
- Sandbox Secret:
- Enter the secret key for your PayPal sandbox account.
Practical Tips
- Use the Sandbox mode for testing and validating payment flows before switching to Live mode for real transactions.
- Ensure your Stripe and PayPal credentials are correct to avoid payment processing errors.
- Regularly review and update your keys and secrets if they are regenerated for security purposes.
